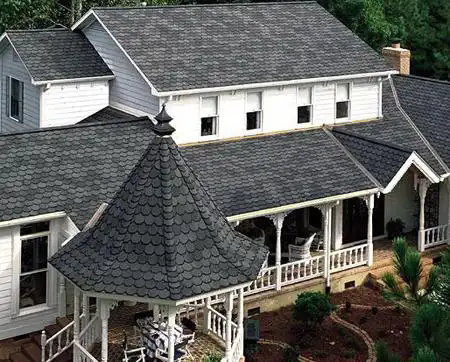
Fish scale asphalt shingles offer a unique and elegant roofing option that can transform the look of any home. With their distinctive rounded, scalloped design, they provide both aesthetic charm and practical durability. Installing them correctly requires careful preparation, the right tools, and a methodical approach.
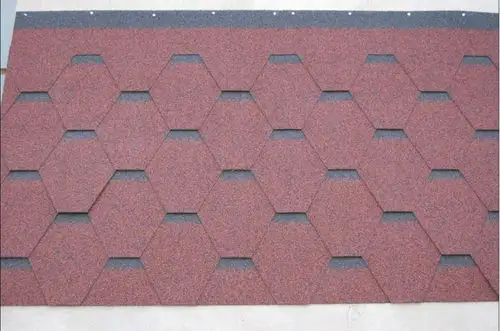
Fish scale asphalt shingles are a decorative variation of traditional asphalt shingles. Made from a blend of asphalt and fiberglass, they are lightweight, weather-resistant, and designed to mimic the overlapping pattern of fish scales. The rounded bottom edge of each shingle creates a scalloped effect, adding visual interest to your roof while maintaining the protective qualities of standard asphalt roofing. These shingles are an excellent choice for homeowners seeking a blend of style and functionality, offering good durability and effective water shedding.
Materials and Tools Needed
Before starting your installation, gather all the necessary materials and tools. Proper preparation is key to a smooth process. Below are two tables outlining what you'll need:
Materials
| Material | Description |
|---|---|
| Fish scale asphalt shingles | Select high-quality shingles in your preferred color and style. |
| Roofing felt/underlayment | Acts as a moisture barrier beneath the shingles. |
| Drip edge | Metal flashing to direct water away from the roof edges. |
| Roofing nails | Galvanized nails designed for roofing; typically 1-1/4 inch long. |
| Roofing cement/sealant | Secures shingles and seals potential leak points. |
| Ridge caps | Special shingles or cut pieces to cover the roof’s peak. |
Tools
| Tool | Description |
|---|---|
| Roofing hammer or nail gun | For fastening shingles securely to the roof deck. |
| Utility knife | For cutting shingles to fit around edges, vents, or valleys. |
| Chalk line | Ensures straight, even rows during installation. |
| Measuring tape | For precise measurements of shingles and roof sections. |
| Ladder | Provides safe access to the roof. |
| Safety gear | Gloves, safety glasses, and non-slip shoes to protect yourself during work. |
Having these items on hand will streamline your installation and help you avoid interruptions.
Step-by-Step to Laying Fish Scale Asphalt Shingles
Installing fish scale asphalt shingles requires precision and patience. Follow these steps for a successful outcome:

1. Prepare the Roof Deck
Start by clearing the roof of any old shingles, nails, or debris. Inspect the deck for damage, such as rot or loose boards, and repair as needed. Lay down roofing felt or underlayment across the entire surface, overlapping seams by at least 2 inches and securing it with roofing nails or staples. This layer provides an extra shield against moisture.
2. Install the Drip Edge
Attach the drip edge along the eaves and rakes of the roof. This metal flashing directs water away from the fascia and into gutters. Secure it with roofing nails every 8-10 inches, ensuring it sits flush against the roof edge.
3. Lay the Starter Course
The starter course establishes a solid base for your shingles. Cut the rounded bottom off a row of fish scale shingles to create a straight edge. Position this course along the eaves, overhanging the drip edge by about 1/2 inch. Nail it in place, placing nails 1 inch from the edges and following the manufacturer’s recommended spacing (typically four nails per shingle).
4. Install the First Row
Begin at the bottom left corner of the roof. Align the first fish scale shingle with the starter course, allowing the rounded edge to hang over the eaves. Secure it with nails according to the manufacturer’s pattern. Work across the roof, ensuring each shingle is flush with its neighbor.
5. Build Subsequent Rows
For the second row, offset the shingles by half a shingle width to create the fish scale pattern. Overlap the row below by the manufacturer-specified amount (usually 5 inches). Use a chalk line to maintain straight, even rows. Continue this process, row by row, until you reach the roof’s peak.
6. Address Valleys and Flashings
In valleys, install metal valley flashing to channel water effectively. Cut shingles to fit around the flashing, leaving a small gap to prevent water pooling. Seal these edges with roofing cement. For chimneys or vents, use step flashing and seal with cement for a watertight finish.
7. Finish with Ridge Caps
At the roof’s peak, install ridge caps to cover the seam. You can cut fish scale shingles into smaller sections or use pre-made ridge caps. Overlap each piece, secure with nails, and cover nail heads with roofing cement to prevent leaks.
Tips and Tricks for Success
- Weather Timing: Install shingles in mild weather—avoid extreme cold (when shingles may crack) or heat (when they become too pliable).
- Nail Precision: Drive nails straight and flush, not too deep or too shallow, to ensure shingles stay secure.
- Ventilation: Maintain proper attic airflow by keeping vents clear, which extends the life of your roof.
- Safety: Wear appropriate gear and use a harness if working on a steep roof. If unsure, hire a professional.
Common Mistakes and Solutions
Mistakes can happen, but they’re avoidable with the right approach. Here’s a table to guide you:
| Mistake | Solution |
|---|---|
| Crooked rows | Snap a chalk line before each row to keep alignment consistent. |
| Incorrect nail placement | Follow the manufacturer’s nailing guide; check each shingle. |
| Poor sealing | Use roofing cement generously around flashings and valleys. |
| Blocked ventilation | Double-check vent placement before covering with shingles. |
Laying fish scale asphalt shingles is a manageable project that can elevate your home’s appearance and protect it from the elements. By preparing thoroughly, following the step-by-step process, and incorporating the tips provided, you’ll achieve a durable and visually appealing roof.